![]()
![]()
![]()


- What is this?
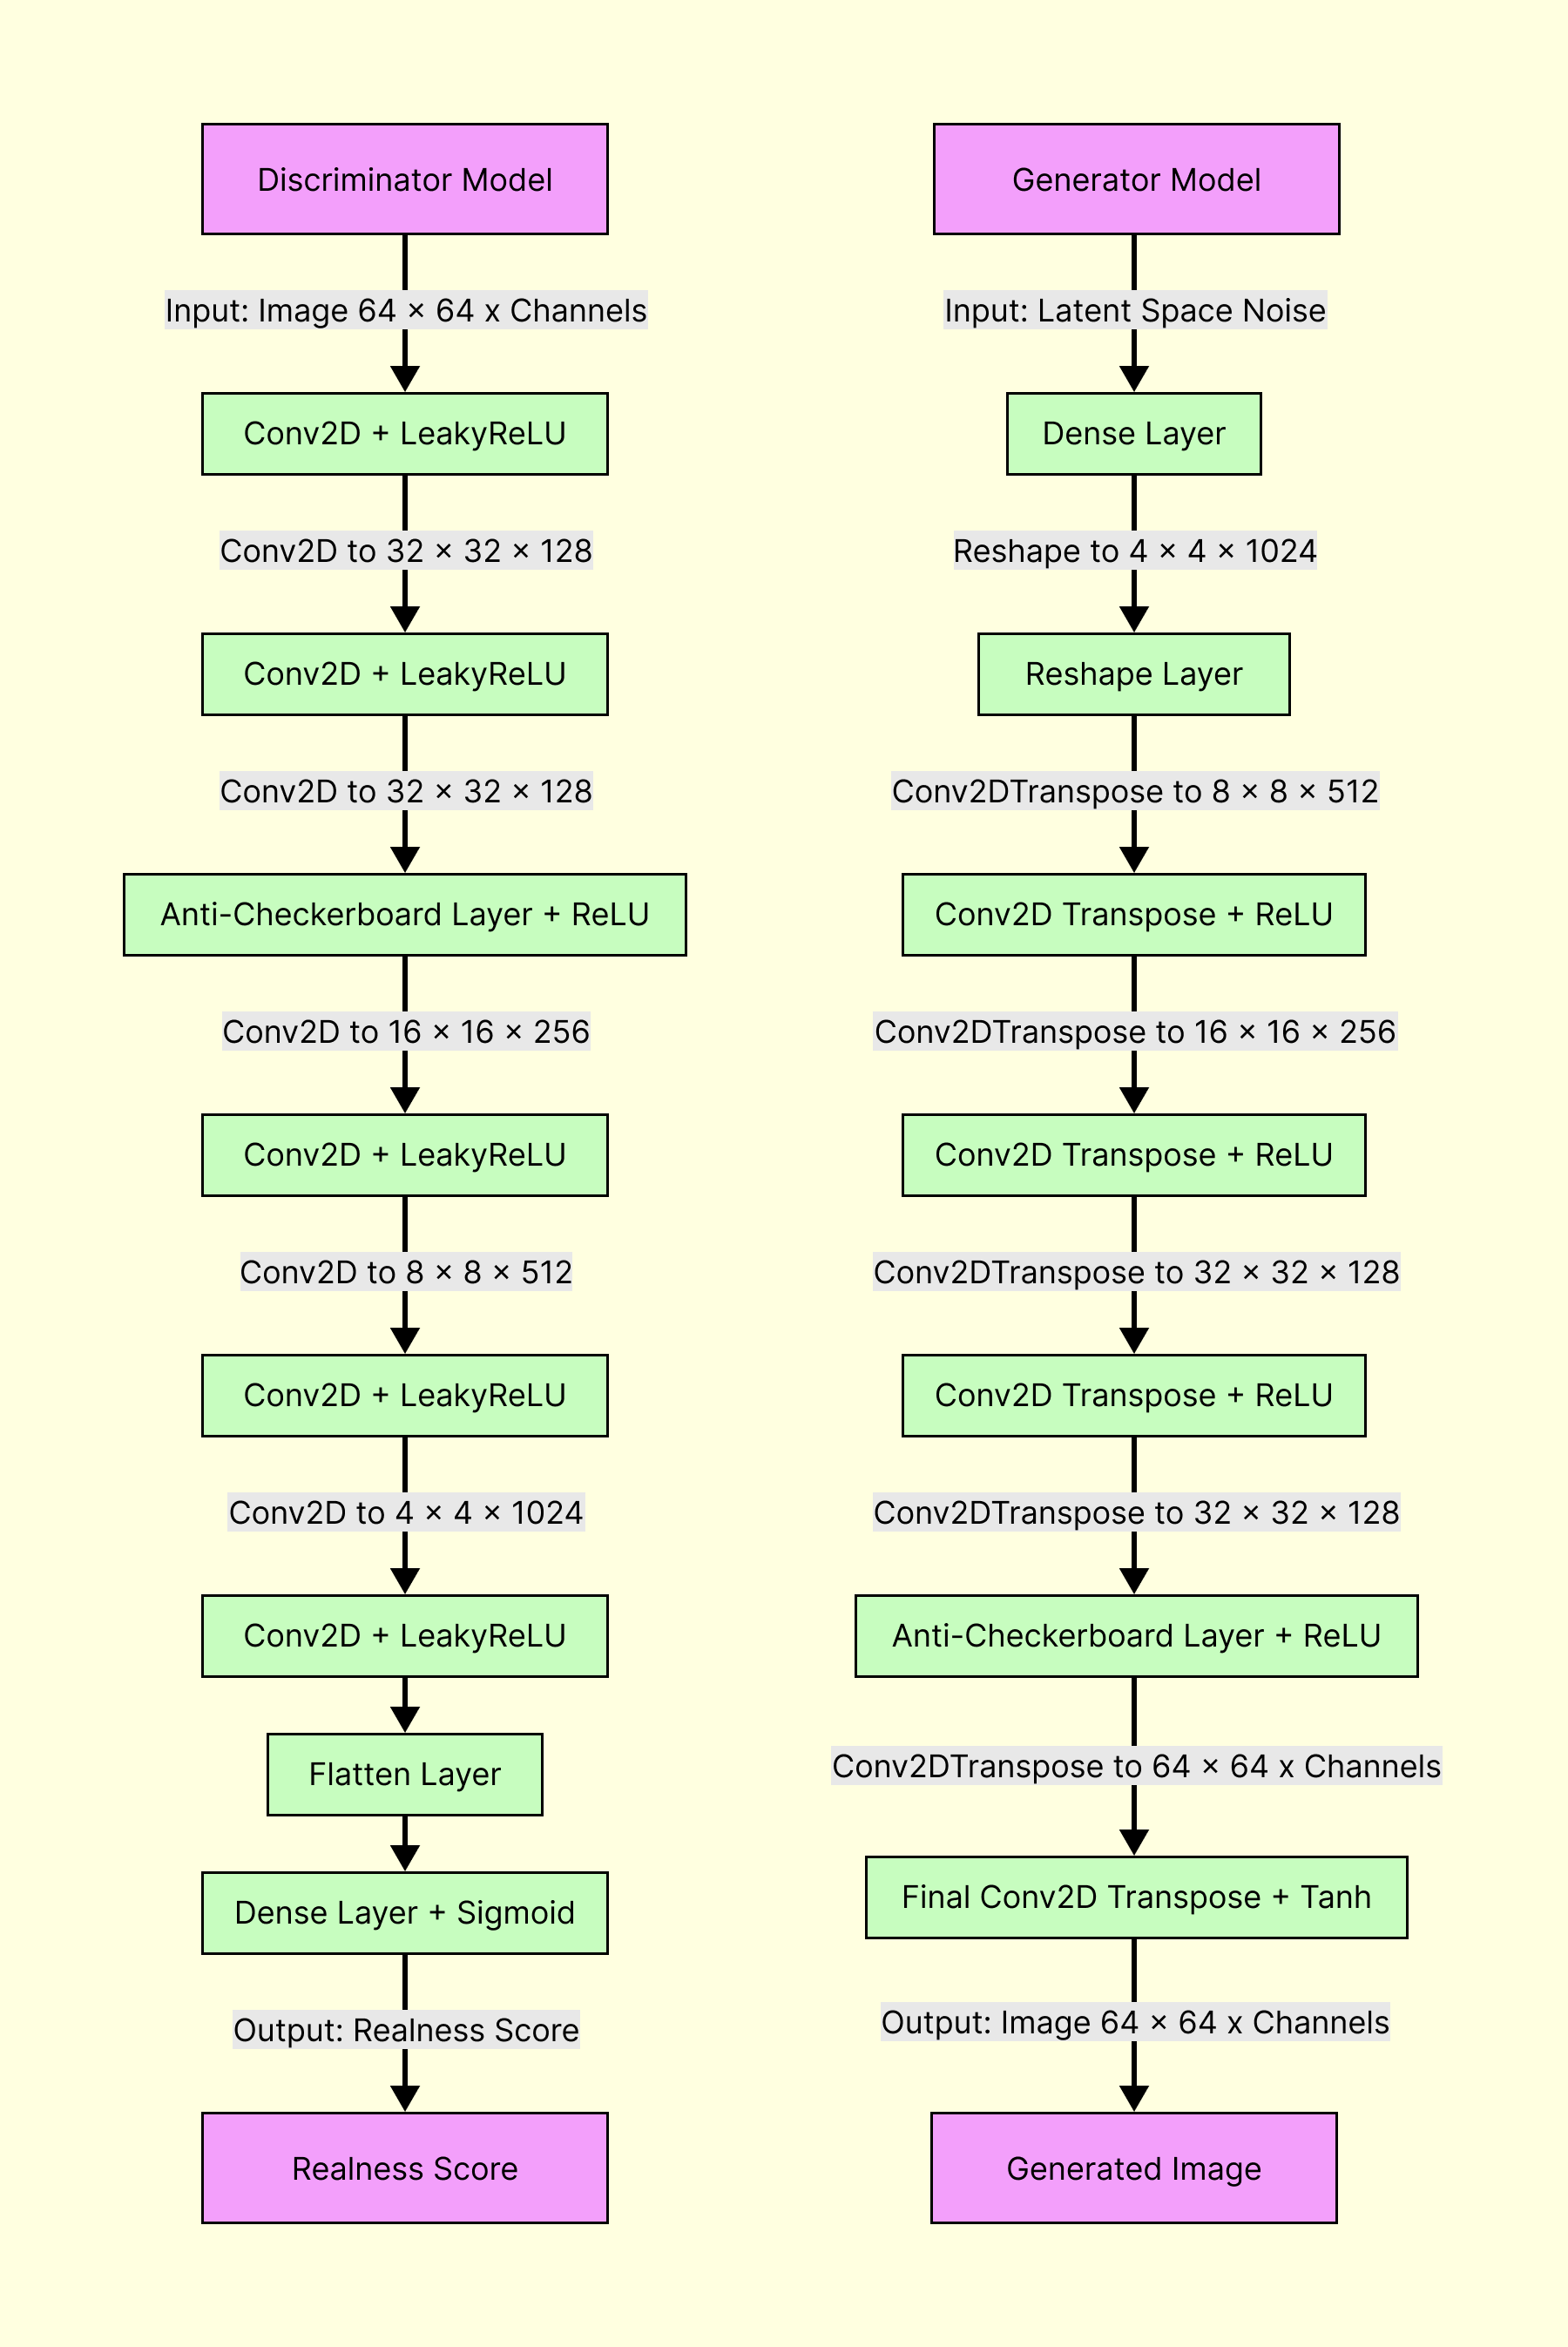
- Model architecture.
- Getting started.
- Build from source.
- Repo's file structure.
- Versioning and automation.
- Arch linux NVIDIA Container Toolkit.
- Windows Support.
This is a mono-repo hosting the source code of a GAN Neural Network model capable of producting (and being trained on) 64x64 images (1 or 3 channels), along with a helper/wrapper library that can be used in any javascript context to load a pre-trained model for immediate use.
Documentation can be found at ai-asmr.github.io/asmr-gan-core.
Latest trained model files can be found here.
The trained model files (model.json, weights.bin) are also uploaded to firebase and are publicly readable.
The library can be found at npm and at the latest release. You can get it via npm like so.
npm i @aimr/asmr-gan-libOr you can install it locally by downloading the latest release.
npm i aimr-asmr-gan-lib-<version>.tgzOr you can import it via cdn like so:
<script src="https://cdn.jsdelivr.net/npm/@aimr/asmr-gan-lib/.cdn/bundle.min.js"></script>// or use require
import AiMR_GAN from "@aimr/asmr-gan-lib";
// import some version of tensorflow in any way you'd like
import * as tf from "@tensorflow/tfjs";
// load the model and/or cache it for subsequent reloads.
await AiMR_GAN.load(tf);
// generate some fake Asmr Images
console.log(await AiMR_GAN.generateChunks(1));To train your own model take a look at the release binaries. To get a quick rundown on how to use it simply run:
asmr-gan-bin-<platform> --helpFor better performance you can also use the binaries via docker like so:
# pull the latest version
sudo docker pull stiliyankushev/aimr-asmr-gan:latest
# run the docker instance (pass arguments at the end)
sudo docker run --gpus all -ti stiliyankushev/aimr-asmr-gan:latest --help
Full example of docker usage:
# assuming the training data is at "/home/kushev/Documents/training-data"
sudo docker run --mount src="/home/kushev/Documents",target="/home",type=bind \
--gpus all -ti stiliyankushev/aimr-asmr-gan:latest \
-i /home/training-data -d /home/dataset.bin -c /home/checkpoints -p /home/preview.png -q 10000 -s 512Running the above docker container will automatically use a version of tensorflow that makes use of native C bindings. It'll also try to take advantage of any CUDA enabled GPUs running on the system. The docker container already pre-configures Cuda and Cudnn to work with tensorflow js. What you need to do is have:
- Nvidia GPU with Cuda support.
- Running a Linux distro.
- Nvidia proprietary drivers installed.
- Installed and configured NVIDIA Container Toolkit. (for arch linux, follow my guide.)
You can build both the library and the binary from source using short predefined npm-scripts. You need to install deps first.
git clone https://github.com/AI-ASMR/asmr-gan-core.git
cd ./asmr-gan-core
npm i
Build the library:
npm run build.libBuild the binaries:
npm run build.binYou can use the binaries directly from source without building executables. This will attempt to use your (CUDA enabled) GPU (Linux Only), same as with the docker container:
npm start -- --helpRunning the above command will work but might not automatically pick up your GPU. That's why it's advised to use the docker image which comes pre-configured. However, if you'd like to run this locally without docker, here's what you need:
- Nvidia GPU with Cuda support.
- Running a Linux distro (preferably supported by tensorflow).
- Cuda installed (version < v12.0.0).
- Nvidia linux driver that supports the version of cuda installed.
- libcudnn installed (version >= 8.9.5).
This is a basic mono-repo that implements both a library and a running process. Both are their own separate typescript npm projects. Both share common assets/files, both share common npm packages listed in the root package.json and both extend root config files such as tsconfig.json.
+-- 📁 bin         # git release files here.
+-- 📁 common      # shared files between lib and src.
+-- 📁 lib         # sources of library here.
+-- 📁 src         # sources of binary here.
+-- 📁 tensorboard # tfjs storage used by bin.
+-- 📁 tests       # unit tests here.
+-- scripts.js     # mini build tool used by the repo.
+-- version.cfg    # version tracker.
+-- package.json
+-- README.md
+-- tsconfig.json
Both the (npm) library and the (git) versioned binary, as well as the docker container share the same common version number. Versioning is automatically increased via CI/CD in the event of meaningful changes. Once there's a version change CI/CD automatically deploys updates for git releases, npm releases and docker tag releases respectively.
CI/CD implementation can be found here:
- version-bump.yml - called on meaningful changes.
- publish-git-version.yml - called on (above) version bump.
- publish-npm-package.yml - called on (above) version bump.
- publish-docker-tag.yml - called on (above) version bump.
- publish-docs.yml - called on (above) version bump.
The repository hosts a minimal, scripted and cross-platform build tool used by all github actions, as well as users (via npm-scripts.)
For more details, read the documented source.
This is a short guide on how to install the NVIDIA Container Toolkit on arch linux. For other Linux distros take a look at their official guide.
I've created a custom PKGBUILD you need to build and install.
Make a fresh directory:
mkdir ./temp-nvidia
cd ./temp-nvidia
Download the PKGBUILD file:
wget https://raw.githubusercontent.com/AI-ASMR/asmr-gan-core/main/PKGBUILDBuild the package:
makepkgInstall all .tar.zst files:
sudo pacman -U \
./libnvidia-container1-1.14.3-1-x86_64.pkg.tar.zst \
./libnvidia-container-tools-1.14.3-1-x86_64.pkg.tar.zst \
./nvidia-container-runtime-1.14.3-1-x86_64.pkg.tar.zst \
./nvidia-container-toolkit-1.14.3-1-x86_64.pkg.tar.zst \
./nvidia-container-toolkit-base-1.14.3-1-x86_64.pkg.tar.zst \
./nvidia-docker2-1.14.3-1-x86_64.pkg.tar.zst
Install libnvidia-container-tools manually:
sudo pacman -Syu libnvidia-container-toolsConfigure docker:
sudo nvidia-ctk runtime configure --runtime=dockerRestart docker afterwards:
sudo systemctl restart dockerAt this point docker should be configured. Test like so:
sudo docker run --gpus all ubuntu nvidia-smiIf nvidia-smi works, than everything works as expected.
The easiest way to run this is to use the docker container in WSL(2) and enable NVIDIA CUDA following this guide.